I've written about Nuri's keto diet here on the blog, and you'd be interested to know that even though I gave up on it in less than a month, Nuri has continued all the way until now. Although, from time to time, he does take a little break - but I think it's only because he's very sweet and wants to accompany me on my carb diet as well! hehe :) There are a few things in this world Nuri would break his keto diet for. One of those few things is... TRES LECHES!
I've had tres leches a total of 4 times in my life, and loved it each time! Nuri had his first a few weeks ago (made by a friend), and when I saw how much he loved it, I knew that this had to be the next cake I learn to make. My first attempt was very good! I found a very straightforward and simple recipe, and our cake turned out divine! By the second time I baked it, it was a walk in the park. I hope you find this recipe simple and easy to follow to! Come give it a try!
1. Begin by whisking together
- 113g softened butter
- 1/2 cup of sugar
- Until smooth and fluffy
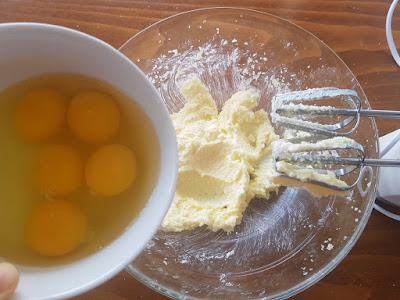
2. Add in 5 eggs
You can either add them one by one or all at once; does not matter.
3. Add a teaspoon of vanilla and whisk it all away!
Pour the mixture little by little into the batter. Be patient here!
6. Bake at around 190°C for 30 minutes.
7. While baking, start to make the tres leches. Tres Leches in Spanish means three milks, because you're going to need three kinds of milk for this!
- 2 cups of milk
- 14 ounce can of condensed milk
- 12 ounce can of evaporated milk
Mix all that together in a bowl. Yes, it looks like a lot but you're going to need all that!
8. When the cake it done baking, take it out of the oven and while it's still hot, poke holes all over. Use a fork, and just poke poke poke, and then let the cake cool. Don't worry about how ugly or messy it might look because we're going to cover it up later!
9. Once the cake cools completely, pour the 3-milk mixture into the cake. Watch the milk soak into those holes you've poked. If you want, you can also run a knife around the edges of the cake, as this allows the milk to also sip through the sides and to the bottom of the pan. Watch all that goodness soak into the cake! It's an art!
10. Cover the cake and refrigerate for maybe an hour or two. While that's happening, clean up! and let your kitten enjoy the leftover batter!
11. After chilling the cake for a few hours, time to cover the top with some whipped cream! Whisk:
- 1.5 cups of whipping cream
- Half to 1 cup of sugar (we chose to only do half a cup, but the recipe I followed suggested a whole cup. So this is totally up to your liking)
- 1 teaspoon of vanilla
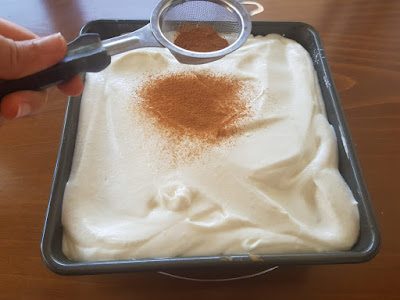
12. Optional but highly recommended: sprinkle some cinnamon powder over the cream.
Refrigerate for a few more hours. It's best served chilled, and it's also good to give the cake more time to soak in all that milk! The cake turned out INCREDIBLE! It was soaked completely, each bite was juicy! I added a messy photo at the end because that was the only way to show you what it truly looked like - with each slice of fork, you'll see milk oozing out of the pores of the cake. The cake was dense, yet moist and soft. The flavour, in my opinion, was all in the condensed milk - who doesn't love condensed milk! The whipped cream on top gave a light touch. Nuri and I took a whole week to finish this cake. On one occasion, we had our slices with some fruits (mango and bananas) and that was an incredible combination, so I highly recommend that as well. You can add strawberries, mangoes, peaches to the top of the whip cream instead of cinnamon powder.


No comments:
Post a Comment
Leave a comment