Friday 28 October 2016

Gummy Halloween

Even though I am generally scared of anything scary - I can not survive a whole scary movie (the last time I watched one, I stayed awake for two whole days), I am terribly afraid of the dark (I cannot sleep in absolute darkness) - I still look forward to halloween every year! Not the scary part of course - but the creative part!


This year - no party, no dress up, so I decided to try something new - make halloween treats! I created three very simple desserts, which I've also given names to.  
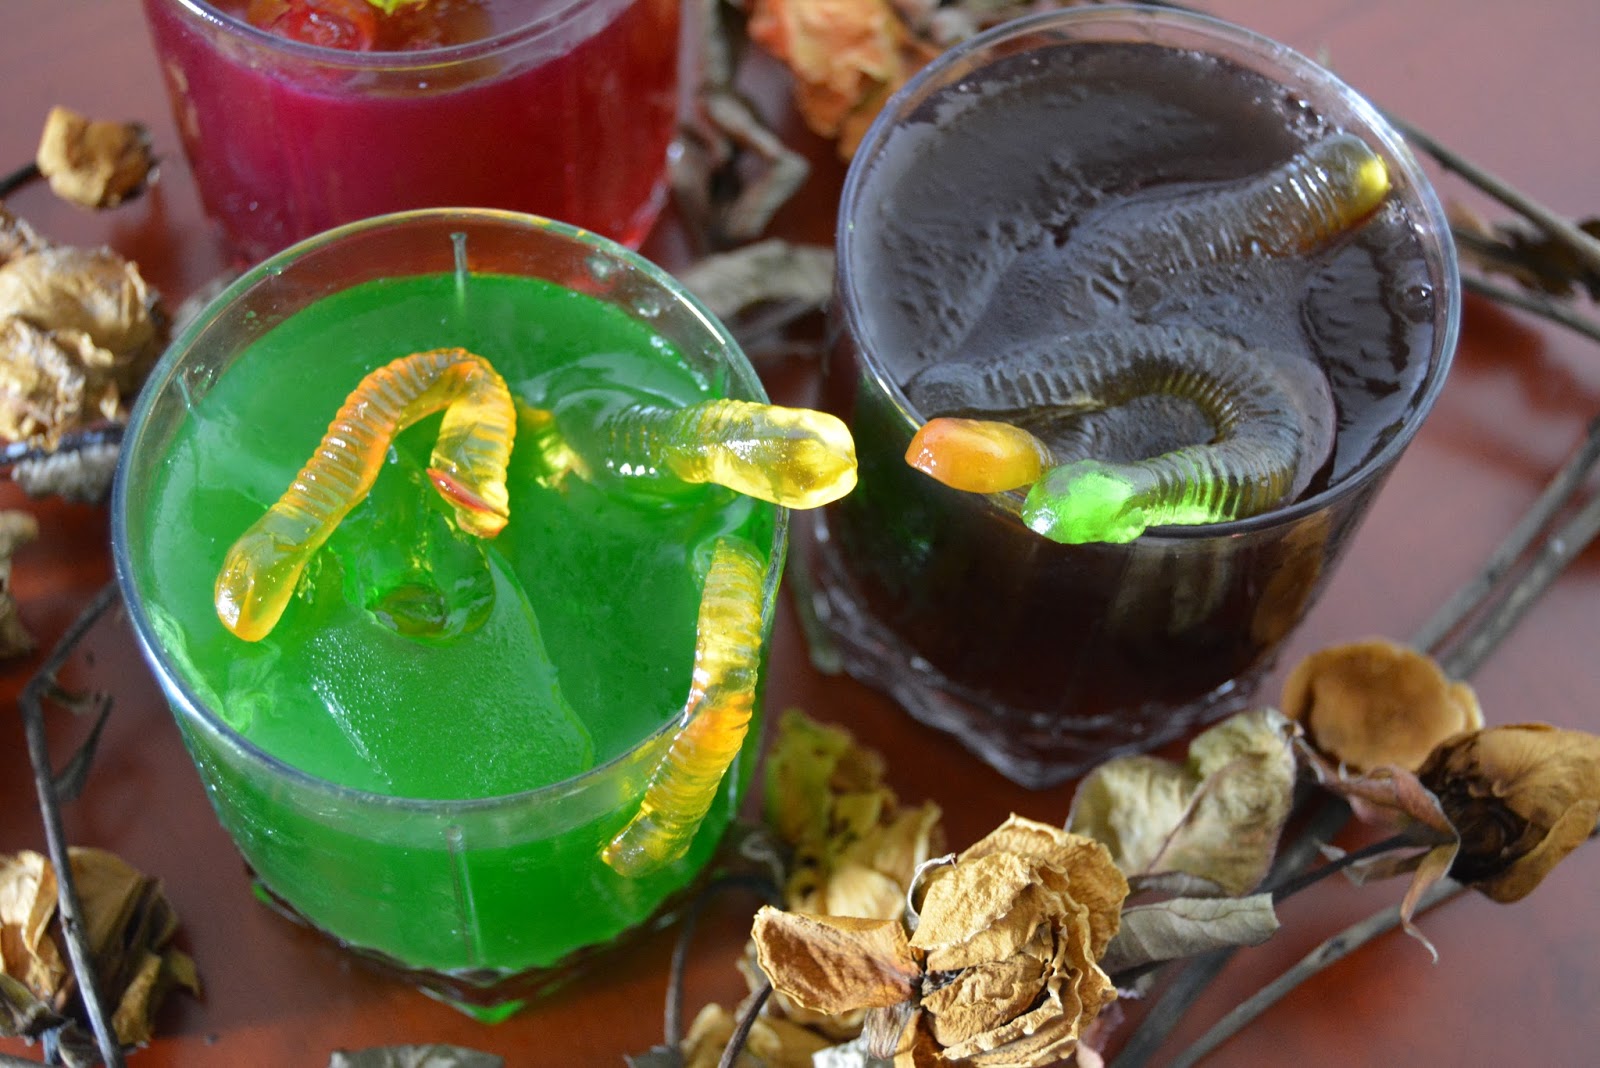
Theme: Gummy worms! 


1. Gummy Jelly Wormy
I prepared two gelatine separately - one red and one green. After melting the jelly powder in hot water, I poured each into a glass, and in the third glass I mixed the green and red, then I let them cool in room temperature. After about 30 minutes I put them in the fridge for five minutes, then took them out and placed the gummy worms (some inside, some on top). See, after just five minutes in the fridge, only the top of the jelly becomes hard, which makes it easy to place gummy worms on top, or pierce one through. After that, I put them back in the fridge and chilled overnight: 


One wormy needs a band-aid

Tuesday 25 October 2016

JYEP 2: complementary activities

Part two of my JYEP series - apart from drawing and coloring, there are many other ways we can help our Junior Youths understand the lessons, internalize the concepts, express their thoughts and feelings and unleash their creativity! Here I'm sharing with you examples of complementary activities I've done with my Junior Youth groups. Feel free to use/share!


I. Breezes of Confirmation

Lesson 3 (Dinner)
Activity: Career Ladder. Ask the students to draw a big ladder with 5 steps. On top of the ladder, they shuold write what they want to become when they grow up. Then on the first step (at the bottom) they should write What does a XXX do? Step 2: What do I need to study?
Step 3: What efforts should I make?
Step 4 and 5: What virtues do I need to practice? 

Lesson 5 (Prefer your brother)
Activity: Prefer your seatmate. Cut out heart shapes, and give one to each student. Ask them to write what they love about the person sitting next to them. Encourage them to describe each other with virtues. Let them write with colors, and if time permits they can draw borders/decorate the heart. In the end, decorate their softboard with the hearts, and while putting them up – read them aloud.  

JYEP 1: artistic expressions

For those who don't already know, the Junior Youth Empowerment Programme is for those in the age group 12 - 15. You call them teenagers, we call them Junior Youths. You call them confused and rebellious, we call them a mine rich in gems of inestimable value. The programme has a couple of books which the group goes through with the help of an animator. These books are more or less story books, each chapter with reading/comprehension and vocabulary exercises, and then quotations to reflect on and memorize. But you can't learn kindness or justice by just reading and answering questions. Definitely you have to practice, that's why engaging the group in service projects is a very important component of this programme. The third way of exploring the concepts/virtues in the stories is through ART (being imaginative and creative). Of course art takes several forms, but this post is about how valuable drawing/coloring is! 

My list of other complementary activities I did for three JYEP books are in the next post.

Drawing is my absolute favorite activity to do with Junior Youths. I recently started a JY group here in Manila, and right after reading the first chapter of Breezes of Confirmation, I asked them to draw the members of their family and write on them what quality they love most about that person. So they could have just written Mom or Dad or the names of their family members and next to it the quality - but I asked them to make an extra effort and draw. Why? Well, I just feel that they write and write all the time in school, so I don't want them to feel that JYEP is just another "class" on weekends. I also asked them to show everyone in the group their drawing...since it was their first day with each other, naturally the JYs were shy. Perhaps they weren't confident about their drawing, but then I didn't pass any sort of judgement; I was just extremely happy that they drew and so I made everyone clap for each other. This again removes any feeling of a "formal classroom" because they aren't getting a grade for their drawing (so no competition).  

Here are some photos/stories from last year, animating over a dozen groups of Junior Youths at City Montessori School, Station Road Campus, Lucknow:

Monday 10 October 2016

The Sweet Side of Lucknow

The center of all sweetness in Lucknow is Moti Mahal. I can't even begin to count the number of times I've gone there by tripling on a motorbike, suicide riding on a rickshaw, and even begging my van driver to detour, just so I can have my dose of sugar. When it wasn't sugar, it was craving salt (paani puri and the insanely yummy aloo tikki with dahi). Funny how I still remember all these names. 
Here's a video of when I braved the streets of Hazratganj on a rickshaw, for the love of ...


Warm halwas and gulab jamuns were in-season during the winter. This is a picture of Carrot Halwa, rich with many kinds of nuts - cashew, pistachio and almonds. Apart from carrot cake, this has been the only other carrot-related dessert I've ever had. I actually find this dessert to be very healthy!


Sunday 2 October 2016

I have a su - I have a shi ... ugh... Su Shi!

And the third no-bake food I prepared for yesterday's occasion waaas a sushi cake! 

nah, just kidding. 

So I'm going to call it Kimbap instead of Sushi. That's because this is more of the Korean version than the Japanese. Difference? Sushi usually has raw fish (the most fish you're ever going to have in a Kimbap would be canned tuna). Kimbaps are also a lot simpler; Sushis are fafafannnccyy and more colorful! I know a lot goes into making the perfect rice, but for me the goal is just to make it sticky. When I was in Iran earlier this year, I made Kimbaps with long basmati grains. For 2 cups of rice I first used 3 cups of water, but while cooking I had to add in another 2 cups of water...in order to get that sticky, mushy texture in the end. 
you can always make it werk werk werk werk wek

Ingredients:  4 cups of Japanese rice (boiled in 5 cups of water), 15 sheets of seaweed paper, Korean chilli paste, pickled radish and burdocks, and (my fave) SPAM ham! 


Spread the rice all over the seaweed sheet. On one end I smeared 
some chilli paste, then on the other end I lined up the 
pickles and the ham. 

Start to roll. I prefer to roll with hands than with the sushi 
rolling mat. This way, I can feel the whole thing as I'm 
rolling to make sure everything's compressed/tight! 
Nah, who am I kidding - I've tried using the 
rolling mat several times, I just couldn't get it right.

Saturday 1 October 2016

Say cheeeeesseecake!

I felt really honored (haha) when my Mom said okay when I asked if I could make her birthday cake this year. She usually does everything (and to perfection), and I'm no where near as amazing as her in the kitchen...so the fact that she let me handle "the cake" was a surprise. The cake is always the highlight of a birthday party, right? So the pressure was on, to make this birthday celebrant happy.... with TWO cakes!


My recipe

The base: Graham crackers. Mash and mash and mash til fine. Then I added a spoon of sugar, and some melted butter (I didn't measure the butter because I really don't measure anything when I bake *I follow my heart* haha!). I mixed everything with a spoon until the crumbs were no longer loose; they were all held together with the butter. Then I flatted the crumbs on the bottom and sides of a springform pan. Refrigerated while making the filling. 

[Since I opted for the no-bake cheesecake, I decided to not use the oven at all even for the base. Whenever I bake cheesecake, I also put the crumbs and pan in the oven to settle, but this time I refrigerated instead. A lot of baking sites suggested this, but I don't think it was a good idea in the end, because my cracker base kept crumbling down. It's either that, or my base was too thick.]


 The filling: Mind you, this was my first time making a no-bake cheese cake; I always use the oven. So I learnt that if you're not going to bake it (with eggs), you use gelatine instead! I went for lemon flavor. I mixed a 3 oz pack with boiling water then kept aside to cool. While waiting, I blended about 550g of cream cheese with two spoons of sugar. Instead of vanilla essence, I used cinnamon powder. When the gelo wasn't so hot anymore, I poured it into the mixture and continued to blend and blend until it was very smooth. Then in the end I folded in some all-purpose cream, and a few spoons of chia seeds [another experiment].

Ice Box Cake

For the first 16 years of my life, my dear mother made my birthday cake. This year, for the first time...I made the birthday cake for my dad (in March) and today for my mom. It's amazing how things change with time; sometimes my mom comes home to food cooked by me and nowadays I'm the one who reminds my Dad to eat healthy...it's basically a reverse of roles!

I made two no-bake cakes for her special day today. An ice box cake and a cheesy cheesecake (see here). Ice box cake is basically biscuit, cream, biscuit, cream...in layers. 
Here's how I did it:

Ingredients: Graham Crackers, All Purpose Cream, Cinnamon Powder, 
Sugar, Cashew Nuts, Banana, Marshmallows. 

I blended the cream with cinnamon powder (just because I love cinnamon powder), and sugar. Blend blend blend for several minutes until cream is really thick.